- 你是不是有闲置的微信号?
- 你想不想有个小秘书定时提醒你将要做的事情?
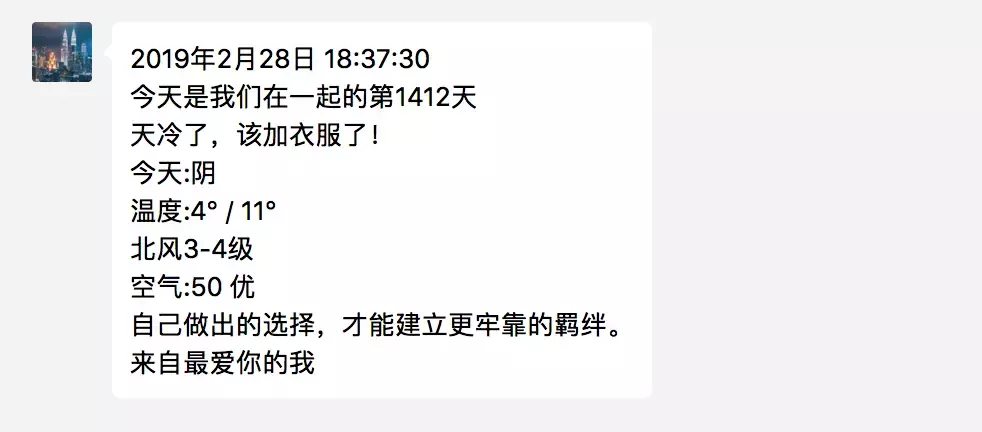
- 你是否为忘记一些纪念日而懊恼?
- 你是否加班到很晚,而忘记了今天和别人有约?
- 你是不是下班还记得拿快递,到家后才发现忘记了?
- 你是不是想学习一下如何做一个微信小秘书?
如果以上问题你有一条符合的话,那就可以安心读下去了,因为微信小秘书可以帮你解决大部分的问题。当然没有符合的话,也可以继续读下去,因为既然来了就说明你还是有兴趣的😆。如果小秘书不符合你要求的话《用Node+wechaty写一个爬虫脚本每天定时给女(男)朋友发微信暖心话》也可以看一下奥!
技术栈
node: 建议最新稳定版,由于wechaty依赖,所以至少node > 10以上版本 Koa: web开发框架,用来编写服务端应用程序
MongoDB:非关系数据库
mongoose:连接 mongodb的一个库
wechaty:提供网页版微信相关操作api接口
node-schedule - 定时任务
项目地址
github:https://github.com/gengchen528/wechat-assistant
功能
很听你话的私人小秘书,帮你创建定时任务,每日提醒,纪念日提醒,当日提醒
文字支持格式:(关键词之间需要用空格分开,特别是昵称和时间要分隔开才行的,时间是24小时制,暂时还不支持表情😭)
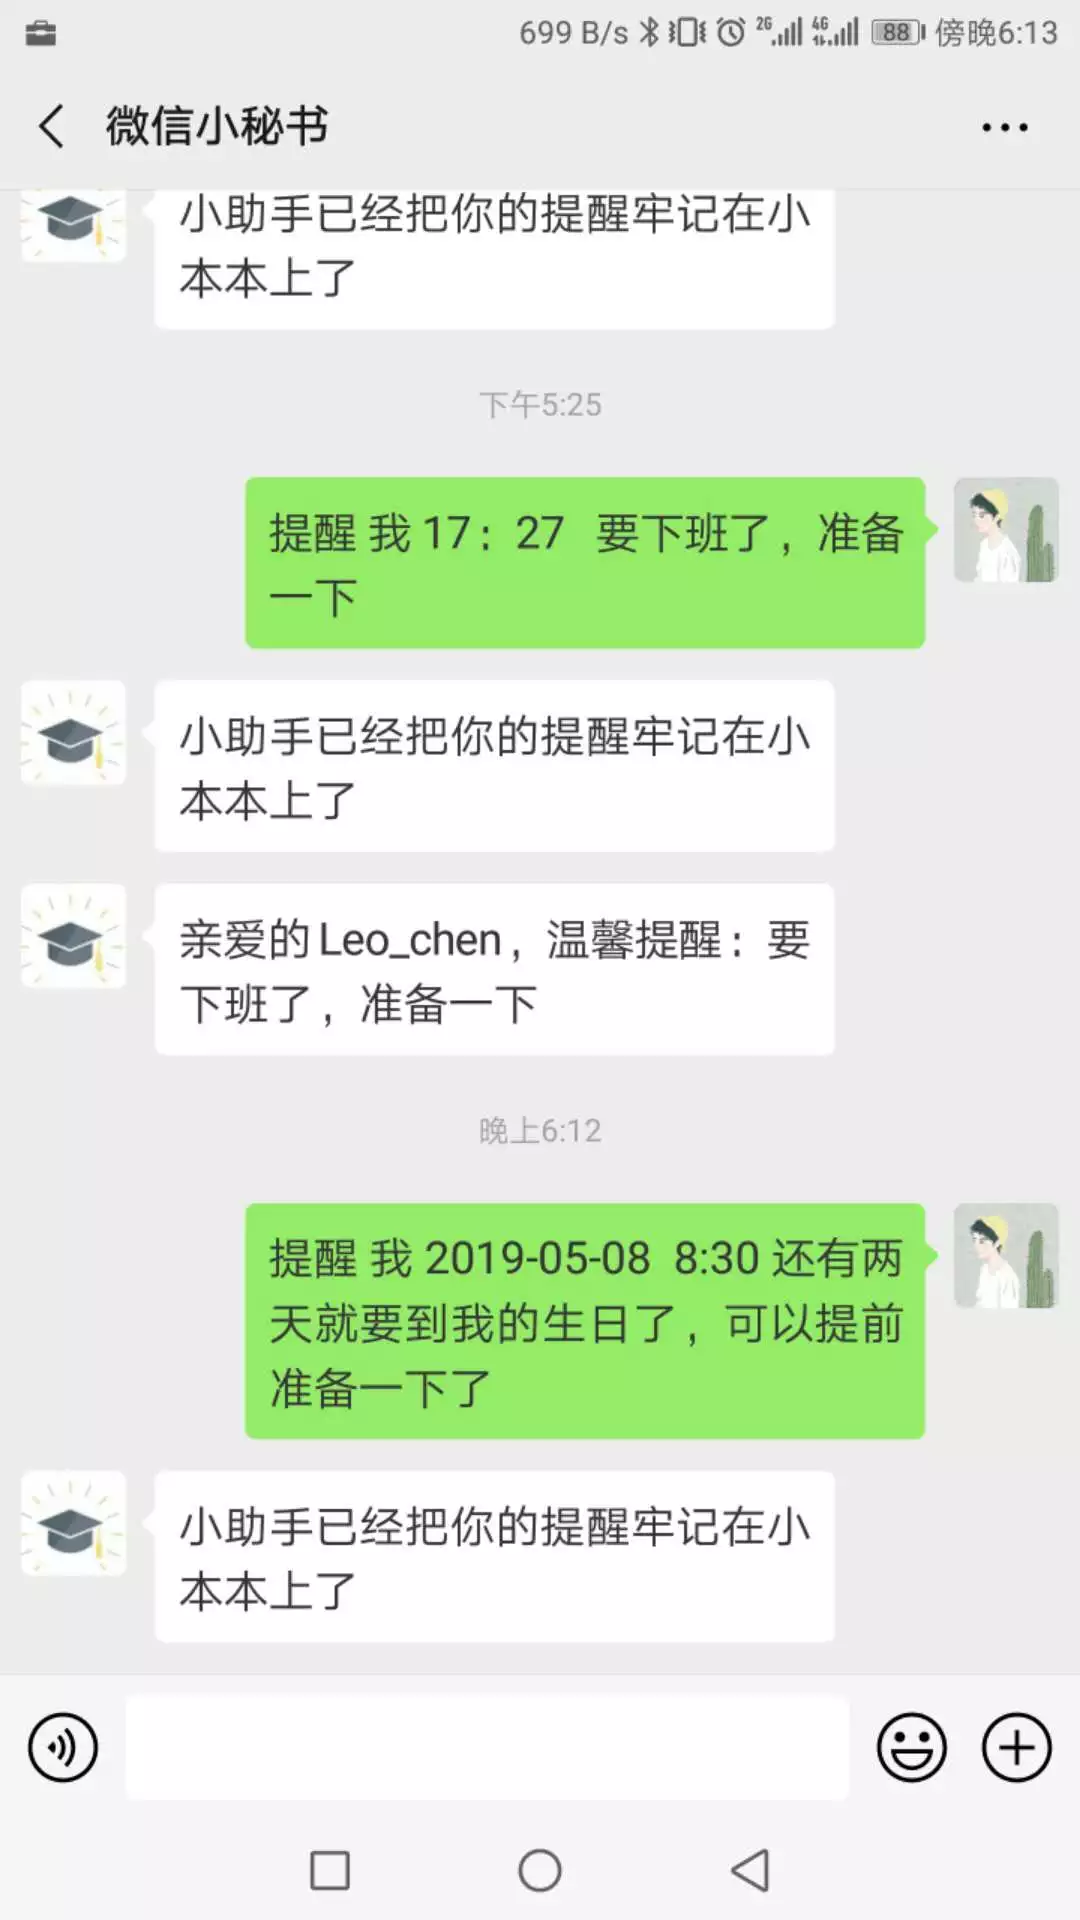
- “提醒 我 18:30 快要下班了,准备一下,不要忘记带东西” (当天指定时间提醒)
- “提醒 其他人昵称 2019-09-10 10:00 工作再忙,也要记得喝水”(委托小秘书提醒其他人)
- “提醒 我 每天 8:00 出门记得带钥匙,公交卡还有饭盒”(每日指定时间提醒)
- “提醒 wo 2019-09-10 10:00 还有两天就是女朋友的生日,要提前准备一下” (指定日期时间提醒)
效果图如下:
提醒自己
委托提醒(前提是你和你想要提醒的人都是小秘书的好友,采用的是昵称查找用户,不是备注要注意)

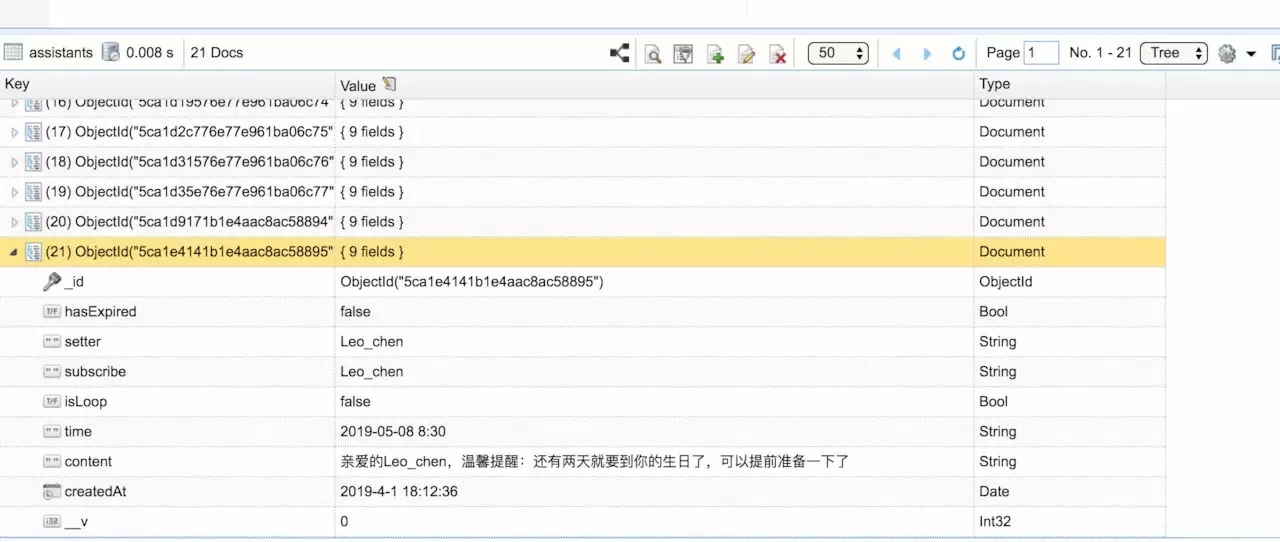
数据库中已添加任务
准备工作
由于本项目使用了MongoDB数据库,所以需要在电脑或服务器中自行安装,这里就不在赘述安装过程啦,不懂怎么安装的小伙伴可以戳链接,MongoDB的可视化工具,我在Mac上使用的是mongobooster,有需要的小伙伴可以去下载一下。
代码说明
目录结构
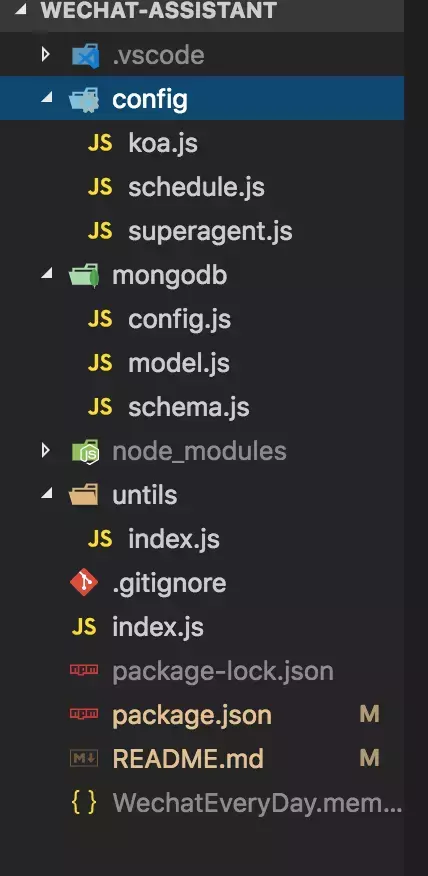
- config: koa,定时任务器,superagent的配置目录
- mongodb: mongodb连接相关配置文件,schema设计与model的主要目录
- untils: 抽取的共用方法
wechaty核心代码
index.js
微信登录,定时任务初始化,小秘书具体实现的主要文件。接口getScheduleList在每次登陆后会从数据库拉取未执行的定时任务并进行初始化,防止意外掉线后无法恢复定时任务。同时每次设置定时任务,接口addSchedule会直接向数据库中插入一条任务记录并把任务添加到定时任务列表中。每次任务执行完毕后,接口updateSchedule都会更新数据库中指定任务的状态,防止任务重复执行。
    import { Wechaty, Friendship }  from 'wechaty'
    import schedule  from './config/schedule'
    import { FileBox }  from 'file-box'
    import Qrterminal  from 'qrcode-terminal'
    import { request }  from './config/superagent'
    import untils  from './untils/index'
    const host = 'http://127.0.0.1:3008/api'

    // 每次登录初始化定时任务
    initSchedule = async(list) => {
        try {
            for (item of list) {
                let time = item.isLoop ? item.time : new Date(item.time)
                schedule.setSchedule(time, async() => {
                    let contact = await bot.Contact.find({ name: item.subscribe })
                    console.log('你的专属提醒开启啦!')
                    await contact.say(item.content)
                    if (!item.isLoop) {
                        request(host + '/updateSchedule', 'POST', '', { id: item._id }).then((result) => {
                            console.log('更新定时任务成功')
                        }).catch(err => {
                            console.log('更新错误', err)
                        })
                    }
                })
            }
        } catch (err) {
            console.log('初始化定时任务失败', err)
        }
    }

    // 二维码生成
    onScan = (qrcode, status) => {
        Qrterminal.generate(qrcode)
        const qrImgUrl = ['https://api.qrserver.com/v1/create-qr-code/?data=', encodeURIComponent(qrcode)].join('')
        console.log(qrImgUrl)
    }

    // 登录事件
    onLogin = async(user) => {
        console.log(`贴心助理${user}登录了`)
        request(host + '/getScheduleList', 'GET').then((res) => {
            let text = JSON.parse(res.text)
            let scheduleList = text.data
            console.log('定时任务列表', scheduleList)
            initSchedule(scheduleList)
        }).catch(err => {
            console.log('获取任务列表错误', err)
        })
    }

    // 登出事件
    onLogout = (user) => {
        console.log(`${user} 登出了`)
    }

    // 消息监听
    onMessage = async(msg) => {
        const contact = msg.from()
        const content = msg.text()
        const room = msg.room()
        if (msg.self()) return
        if (room) {
            const roomName = await room.topiac()
            console.log(`群名: ${roomName} 发消息人: ${contact.name()} 内容: ${content}`)
        } else {
            console.log(`发消息人: ${contact.name()} 消息内容: ${content}`)

            let keywordArray = content.replace(/\s+/g, ' ').split(" ") // 把多个空格替换成一个空格,并使用空格作为标记,拆分关键词
            console.log("分词后效果", keywordArray)
            if (keywordArray[0] === "提醒") {
                let scheduleObj = untils.contentDistinguish(contact, keywordArray)
                addSchedule(scheduleObj)
                contact.say('小助手已经把你的提醒牢记在小本本上了')
            } else {
                contact.say('很高兴你能和我聊天,来试试我的新功能吧!回复案例:“提醒 我 18:30 下班回家”,创建你的专属提醒,记得关键词之间使用空格分隔开')
            }
        }
    }

    // 添加定时提醒
    addSchedule = async(obj) => {
        request(host + '/addSchedule', 'POST', '', obj).then(async(res) => {
            res = JSON.parse(res.text)
            let nickName = res.data.subscribe
            let time = res.data.time
            let Rule1 = res.data.isLoop ? time : new Date(time)
            let content = res.data.content
            let contact = await bot.Contact.find({ name: nickName })
            schedule.setSchedule(Rule1, async() => {
                console.log('你的专属提醒开启啦!')
                await contact.say(content)
                if (!res.isLoop) {
                    request(host + '/updateSchedule', 'POST', '', { id: res.data._id }).then((result) => {
                        console.log('更新定时任务成功')
                    }).catch(err => {
                        console.log('更新错误', err)
                    })
                }
            })
        }).catch(err => {
            console.log('错误', err)
        })
    }

    // 自动加好友
    onFriendShip = async(friendship) => {
        let logMsg
        try {
            logMsg = '添加好友' + friendship.contact().name()
            console.log(logMsg)
            switch (friendship.type()) {
                /**
                 *
                 * 1. New Friend Request
                 *
                 * when request is set, we can get verify message from `request.hello`,
                 * and accept this request by `request.accept()`
                 */
                case Friendship.Type.Receive:
                    await friendship.accept()
                    break
                    /**
                     *
                     * 2. Friend Ship Confirmed
                     *
                     */
                case Friendship.Type.Confirm:
                    logMsg = 'friend ship confirmed with ' + friendship.contact().name()
                    break
            }
        } catch (e) {
            logMsg = e.message
        }
        console.log(logMsg)
    }
    const bot = new Wechaty({ name: 'WechatEveryDay' })
    bot.on('scan', onScan)
    bot.on('login', onLogin)
    bot.on('logout', onLogout)
    bot.on('message', onMessage)
    bot.on('friendship', onFriendShip)
    bot.start()
        .then(() => { console.log('开始登陆微信') })
        .catch(e => console.error(e))
untils/index.js
这里主要是输入关键词后的处理方法,在index.js中,我把用户输入的关键词根据空格来进行分词处理,放到一个数组中,然后传入contentDistinguish()方法中。根据关键词的不同来进行处理是否是属于每日任务,当日定时任务,还是属于指定日期任。因为不同的定时任务类型,在时间格式上是有所区分的,每日任务我采用的是Cron风格定时器,类似0 30 8 * * *(每天8点30提醒)这种,而指定日期时间和当日任务我使用的是new Date('2019-9-10 12:30:00')来处理。
同时为了兼容性,在日期处理上采用了全角替换半角的冒号格式,内容上为了更符合秘书的身份,将主语我全部替换成你,也处理了自己给自己创建定时任务与你给别人创建定时任务内容上的不同。
    getToday = () => { // 获取今天日期
        const date = new Date()
        let year = date.getFullYear()
        let month = date.getMonth() + 1
        let day = date.getDate()
        return year + '-' + month + '-' + day + ' '
    }

    convertTime = (time) => { // 转换定时格式
        let array = time.split(':')
        return "0 " + array[1] + ' ' + array[0] + ' * * *'
    }

    contentDistinguish = (contact, keywordArray) => {
        let scheduleObj = {}
        let today = getToday()
        scheduleObj.setter = contact.name() // 设置定时任务的用户
        scheduleObj.subscribe = (keywordArray[1] === "我") ? contact.name() : keywordArray[1] // 定时任务接收者
        if (keywordArray[2] === "每天") { // 判断是否属于循环任务
            console.log('已设置每日定时任务')
            scheduleObj.isLoop = true
            scheduleObj.time = convertTime(keywordArray[3])
            scheduleObj.content = (scheduleObj.setter === scheduleObj.subscribe) ? scheduleObj.content = "亲爱的" + scheduleObj.subscribe + ",温馨提醒:" + keywordArray[4].replace('我', '你') : "亲爱的" + scheduleObj.subscribe + "," + scheduleObj.setter + "委托我提醒你," + keywordArray[4].replace('我', '你')
        } else if (keywordArray[2] && keywordArray[2].indexOf('-') > -1) {
            console.log('已设置指定日期时间任务')
            scheduleObj.isLoop = false
            scheduleObj.time = keywordArray[2] + ' ' + keywordArray[3].replace(':', ':')
            scheduleObj.content = (scheduleObj.setter === scheduleObj.subscribe) ? scheduleObj.content = "亲爱的" + scheduleObj.subscribe + ",温馨提醒:" + keywordArray[4].replace('我', '你') : "亲爱的" + scheduleObj.subscribe + "," + scheduleObj.setter + "委托我提醒你," + keywordArray[4].replace('我', '你')
        } else {
            console.log('已设置当天任务')
            scheduleObj.isLoop = false
            scheduleObj.time = today + keywordArray[2].replace(':', ':')
            scheduleObj.content = (scheduleObj.setter === scheduleObj.subscribe) ? scheduleObj.content = "亲爱的" + scheduleObj.subscribe + ",温馨提醒:" + keywordArray[3].replace('我', '你') : "亲爱的" + scheduleObj.subscribe + "," + scheduleObj.setter + "委托我提醒你," + keywordArray[3].replace('我', '你')
        }
        return scheduleObj
    }
    module.exports = {
        getToday,
        convertTime,
        contentDistinguish
    }
koa核心代码
koa就不用多说了,TJ大神继express后的又一神作,很轻量,而且摆脱了“回调地狱”的问题,放一张大神头像镇楼(发型很帅啊,哈哈)

koa服务默认使用3008端口,如果修改的话,需要在index.js中修改host的地址。这里目前写了三个接口,分别是添加定时任务,获取定时任务列表和更新任务列表,对应的数据库curd操作均在mongodb/model.js中完成
config/koa.js
    import Koa  from 'koa'
    import Router  from 'koa-router'
    import bodyParser  from 'koa-bodyparser'
    import model  from '../mongodb/model'

    const app = new Koa()
    const router = new Router()
    app.use(bodyParser())

    router.post('/api/addSchedule', async(ctx, next) => { // 添加定时任务
        let body = ctx.request.body;
        console.log('接收参数', body)
        let res = await model.insert(body);
        ctx.body = { code: 200, msg: "ok", data: res }
        next()
    })

    router.get('/api/getScheduleList', async(ctx, next) => { // 获取定时任务列表
        const condition = { hasExpired: false }
        let res = await model.find(condition)
        ctx.response.status = 200;
        ctx.body = { code: 200, msg: "ok", data: res }
        next()
    })
    router.post('/api/updateSchedule', async(ctx, next) => { // 更新定时任务
        const condition = { _id: ctx.request.body.id }
        let res = await model.update(condition)
        ctx.response.status = 200;
        ctx.body = { code: 200, msg: "ok", data: res }
        next()
    })

    const handler = async(ctx, next) => {
        try {
            await next();
        } catch (err) {
            ctx.respose.status = err.statusCode || err.status || 500;
            ctx.response.type = 'html';
            ctx.response.body = '<p>出错啦</p>';
            ctx.app.emit('error', err, ctx);
        }
    }

    app.use(handler)
    app.on('error', (err) => {
        console.error('server error:', err)
    })

    app.use(router.routes())
    app.use(router.allowedMethods())
    app.listen(3008, () => {
        console.log('[demo] route-use-middleware is starting at port 3008')
    })
mongose核心代码
mongodb/config.js
这里主要是MongoDB的主要配置文件,使用了mongoose链接MongoDB数据库,默认端口27017,创建了一个名为wechatAssitant的库
    import mongoose  from 'mongoose'

    const db_url = 'mongodb://localhost:27017/wechatAssitant'
    let db = mongoose.connect(db_url, { useNewUrlParser: true })

    //连接成功
    mongoose.connection.on('connect', () => {
        console.log("Mongoose connection open to " + db_url)
    })

    //连接异常
    mongoose.connection.on('error', (err) => {
        console.log("Mongoose connection erro " + err);
    });

    //连接断开
    mongoose.connection.on('disconnected', () => {
        console.log("Mongoose connection disconnected ");
    });

    module.exports = mongoose

mongodb/schema.js
在Mongoose里一切都是从Schema开始的,每一个Schema都会映射到MongoDB的一个collection上。Schema定义了collection里documents的模板(或者说是框架),如下代码定义了定时任务的Schema:
    import mongoose  from './config'
    const Schema = mongoose.Schema

    let assistant = new Schema({
        subscribe: String, // 订阅者
        setter: String, // 设定任务者
        content: String, // 订阅内容
        time: String, // 定时日期
        isLoop: Boolean, // 是否为循环定时任务
        hasExpired: { type: Boolean, default: false }, // 判断任务是否过期
        createdAt: { type: Date, default: Date.now },
    })

    module.exports = mongoose.model('Assistant', assistant)
mongodb/model.js
为了使用定义好的Schema,我们需要把Schema转换成我们可以使用的model(其实是把Schema编译成model,所以对于Schema的一切定义都要在compile之前完成)。也就是说model才是我们可以进行操作的handle,具体实现代码mongoose.model('Assistant', assistant),这里我们已经在schema.js文件中直接导出,直接在model.js中引用
    import Assistant  from './schema'

    module.exports = {
        insert: (conditions) => { // 添加定时任务
            return new Promise((resolve, reject) => {
                Assistant.create(conditions, (err, doc) => {
                    if (err) return reject(err)
                    console.log('创建成功', doc)
                    return resolve(doc)
                })
            })
        },

        find: (conditions) => { // 获取定时任务列表
            return new Promise((resolve, reject) => {
                Assistant.find(conditions, (err, doc) => {
                    if (err) return reject(err)
                    return resolve(doc)
                })
            })
        },
        update: (conditions) => { // 更新定时任务状态
            return new Promise((resolve, reject) => {
                Assistant.updateOne(conditions, { hasExpired: true }, (err, doc) => {
                    if (err) return reject(err)
                    return resolve(doc)
                })
            })
        }
    }
项目运行
由于需要安装chromium,所以要先配置一下镜像,注意由于wechaty的限制,必须使用node10以上版本
npm或者yarn 配置淘宝源
(很重要,防止下载chromium失败,因为下载文件在150M左右,所以在执行npm run start后需要等待下载大概一两分钟以上,请耐心等待)
npm
npm config set registry https://registry.npm.taobao.org
npm config set disturl https://npm.taobao.org/dist
npm config set puppeteer_download_host https://npm.taobao.org/mirrors
yarn
yarn config set registry https://registry.npm.taobao.org
yarn config set disturl https://npm.taobao.org/dist
yarn config set puppeteer_download_host https://npm.taobao.org/mirrors
下载项目安装依赖
git clone git@github.com:gengchen528/wechat-assistant.git
cd wechat-assistant.git
npm install
npm run start
扫描登录
用微信扫描控制台显示的二维码,在手机上同意登录即可。使用其他微信发送指定格式文字进行添加定时任务。
服务器部署
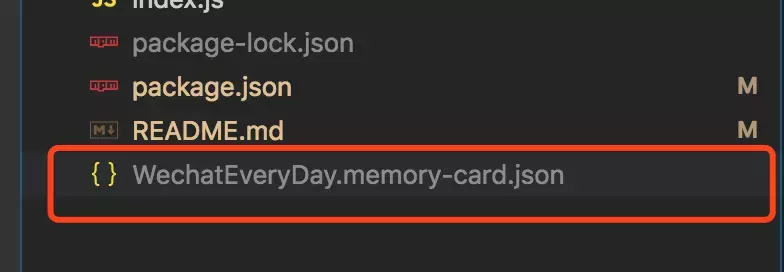
1、如果需要在服务器中部署,需要先扫描二维码登录一次,生成微信维持登录状态的json文件,如下图:
 2、生成此文件后,可以使用pm2工具进行进程守护。由于为了方便,本地开发的时候,我设置的
npm run start同时执行了两条命令,所以在服务器端部署的时候,建议先启动koa.js后再启动index.js
常见问题
-
我的微信号无法登陆
从2017年6月下旬开始,使用基于web版微信接入方案存在大概率的被限制登陆的可能性。 主要表现为:无法登陆Web 微信,但不影响手机等其他平台。 验证是否被限制登陆: https://wx.qq.com 上扫码查看是否能登陆。 更多内容详见:
Can not login with error message: 当前登录环境异常。为了你的帐号安全,暂时不能登录web微信。
-
执行npm run start时无法安装puppet-puppeteer&&Chromium
Centos7下部署出现以下问题
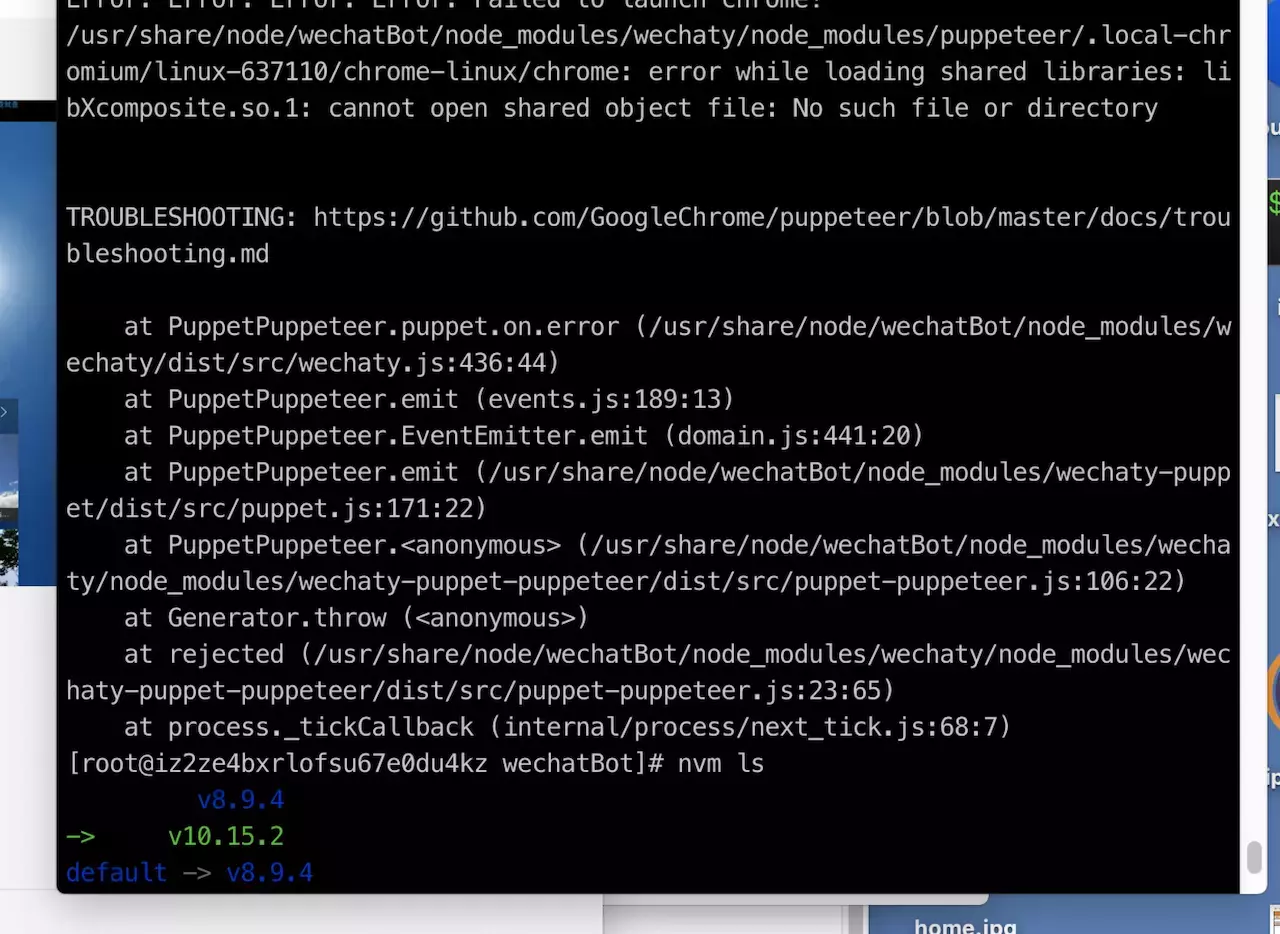
问题原因: https://segmentfault.com/a/1190000011382062
解决方案:
依赖库
yum install pango.x86_64 libXcomposite.x86_64 libXcursor.x86_64 libXdamage.x86_64 libXext.x86_64 libXi.x86_64 libXtst.x86_64 cups-libs.x86_64 libXScrnSaver.x86_64 libXrandr.x86_64 GConf2.x86_64 alsa-lib.x86_64 atk.x86_64 gtk3.x86_64 -y
字体
yum install ipa-gothic-fonts xorg-x11-fonts-100dpi xorg-x11-fonts-75dpi xorg-x11-utils xorg-x11-fonts-cyrillic xorg-x11-fonts-Type1 xorg-x11-fonts-misc -y
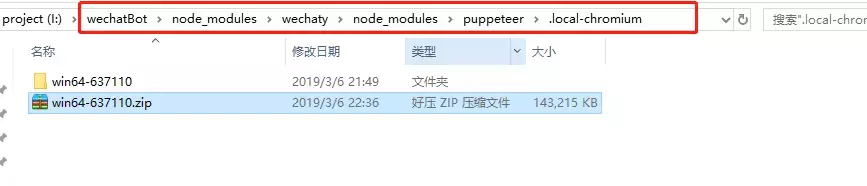
- windows下,下载puppeteer失败
链接:https://pan.baidu.com/s/1YF09nELpO-4KZh3D2nAOhA 提取码:0mrz
把下载的文件放到如下图路径,并解压到当前文件夹中即可
- 支持 红包、转账、朋友圈… 吗
支付相关 - 红包、转账、收款 等都不支持
- 更多关于wechaty功能相关接口
-
其他问题解决方案
- 本地是否安装了mongodb数据库
- 先检查node版本是否大于10
- 确认npm或yarn已经配置好淘宝源
- 存在package-lock.json文件先删除
- 删除
node_modules后重新执行npm install或cnpm install
注意
本项目属于个人兴趣开发,开源出来是为了技术交流,请勿使用此项目做违反微信规定或者其他违法事情。 建议使用小号进行测试,有被微信封禁网页端登录权限的风险(客户端不受影响),请确保自愿使用。
最后
我的小秘书已经学会了自动加好友功能,所以有兴趣的小伙伴可以加我的微信进行测试,她也可以是你的私人小秘书😆(注意别发太多信息,会把她玩坏的)

赶快亲自试一试吧,相信你会挖掘出更多好玩的功能
github:https://github.com/gengchen528/wechat-assistant
另外我的公众号已经接入微软小冰,关注后发语音会有小姐姐的声音陪你聊天,也可以和她文字聊天,有兴趣可以试试看,单身的欢迎来撩

作者: Leo_chen,前端工程师,喜欢使用node做各种小项目,就职于大数据公司。本篇文章首发于掘金: 使用koa2+wechaty打造个人微信小秘书