生活中学校通知信息都会借助微信群聊发布,并且时常会要求“收到请回复”。这就导致了少数重要信息与大量无关信息混杂在一起,屏蔽与不屏蔽都不是好办法。遂实现了命令行控制的「微信机器人」,并在此基础上完成了群聊信息过滤功能。
1. 开发过程
- 微信官方并没有相关的API。已知的
企业微信机器人和聊天平台有局限性,并不能灵活的完成我所期望的功能以及实现未来可能的拓展。 - 找了很多开源的
wxbot,但他们都是基于Web版微信,笔者的微信账号并不能登陆成功。 - 后来找到了
Wechaty,发现它完美解决了与微信交互的问题,并且封装了各式各样的接口,有详细的API文档。于是参与了开源激励计划,获取了免费甚至长期有效的iPad Puppet的Token。
2. 核心代码
完整代码请访问LazyBot Public Repo。
利用Wechaty与微信交互
查阅了Wechaty的API文档,并且学习了介绍视频之后,笔者首先完成了一个入口程序,以方便移植与拓展。
// ./index.js
import tokenJSON  from './token.json'
import infoJSON  from './package.json'
console.log(`Running LazyBot ${infoJSON.version}...`)
console.log(`Trying to detect 'token' from './token.json'`)
if (!tokenJSON.token) {
    console.log(`Unable to acquire 'token' field from './token.json'. If you don't possess token of Wechaty, turn to https://github.com/juzibot/Welcome/wiki/Everything-about-Wechaty for more information.`)
    return
}
console.log(`Detect 'token' from './token.json': ${tokenJSON.token}`)
import main  from './main.js'
main(tokenJSON.token, './bot-settings.json')
其中token被保存在./token.json中,bot的设定被保存在./bot-settings.json中。
随后,笔者仿照视频搭建了一个Wechaty的基本框架。
// ./main.js
module.exports = function(token, botSettingFile) {
    // Import Wechaty
    // ...
    // Import Settings
    // ...
    import botSettings  from './bot-settings.json';
    import schedule  from 'node-schedule';
    // Import Command System
    import commandUnits  from './commands.js';
    import utils  from './utils.js';
    // Construct Puppet
    const puppet = new PuppetPadplus({ token });
    const name = "LazyBot";
    const bot = new Wechaty({ puppet, name });
    // Initialize Writing Settings
    // Writing Settings of Bot to local file every 10 min.
    // ...
    // Initialize Bot Settings
    // ...
    // Begin Bot
    bot
    .on('scan', function (qrcode, status) {
        if (status === ScanStatus.Waiting) {
            QrcodeTerminal.generate(qrcode);
        }
    })
    .on('login', function (user) {
        console.log(`${user.name()} Login`);
    })
    .on('logout', function (user) {
        console.log(`${user.name()} Logout`);
    })
    .on('room-invite', async roomInvitation => {
        // ...
    })
    .on('room-leave', async (room, leaverList, remover) => {
        // ...
    })
    .on('friendship', async (friendship) => {
        // ...
    })
    .on('message', async function(message){
        // ...
    });
    bot.start();
}
其中,bot的配置被保存在了botSettings当中,并且每隔10 min就被保存到本地./bot-settings.json中。
解析命令
首先,为了区别普通的消息与命令,笔者规定任何以.开头的消息文本都被视为命令。但是保险起见,笔者要求在群聊当中,
需要先开启 LazyBot,然后才会触发解析。
// ./utils.js
/**
 * Test whether message is a command
 * @param {string} message
 * @returns {boolean}
 */
function isCommand(message) {
    return message[0] === '.';
}
// ./main.js -> 'message' event function
if (message.room()) {
    const id = message.room().id;
    // ...
    // Initialize settings of group
    if (!botSettings["groups"][id]) botSettings["groups"][id] = { "switch": false, "monitors": {} };
    // ...
    if (utils.isCommand(text)) {
        // Enable or Disable LazyBot
        if (text === ".enable-lazybot") { botSettings["groups"][id]["switch"] = true; return;}
        else if (text === ".disable-lazybot") { botSettings["groups"][id]["switch"] = false;return; }
        // ... Parse Command if ("switch" === true) and Do Something
    }
}
然后,是解析的实现。命令以空格作为分隔符,但是考虑到有时候空格可能会作为参数的一部分,笔者采用了被包裹在配对的"
或'之间的空格将不再被视作为分隔符的解决方案。解析完毕后,会生成一个命令对象。
// ./utils.js
/**
 * Parse message as command
 * ' ', which is not between '' or "", is perceived as separator
 * subCommand beginning with '-' is perceived as non-boolean flag
 * subCommand beginning with '--' is perceived as boolean flag
 * @param {string} message
 */
function parseCommand (message) {
    // ... function for checking boolean flag
    // ... function for checking non-boolean flag
    const ret = {
        mainCommand:"",
        flags:{},
        args:[],
        err: ""
    };
    const _commands = message.split(' ');
    const commands = [];
    // After Splitting message by ' ', merge items like ["a, b"], and delete quotes.
    // e.g. ".abc 'abc e'" => [".abc", "'abc", "e'"] => [".abc", "abc e"]
    // ...
    // Parse Commands
    // ...
    return ret;
    }
其中,以--开头的参数被认为是boolean flag,而以-开头的参数被认为是non-boolean flag,并且其后所接的参数被认为属于这个flag。
至此,命令行的输入与解析就实现完成。之后就是相应功能的实现。为了能够一般化命令行指令,笔者定义了一个处理中心,接收解析好的命令,并且 找到合适的实例去执行。
// ./commands.js
/**
 * Command ".help" is reserved for listing all possible commands with their descriptions.
 */
class CommandUnits{
    RegisterCommand(command, description) {
        this.commands[command.mainCommand] = command;
        this.descriptions[command.mainCommand] = description;
    }
    RegisterRegexCommand(regex, command, display, description) {
        this.regexCommands.push({
            regex, command, display, description
        });
    }
    CallCommand(parsedCommands, message, botSettings){
        if (parsedCommands.mainCommand === ".help") {
            // Display All Possible Commands
            // ...
            return ret;
        }
        // Test for complete Match first
        if (this.commands[parsedCommands.mainCommand]) return this.commands[parsedCommands.mainCommand].Call(parsedCommands, message, botSettings);
        for (const regexCommand of this.regexCommands) {
            if (regexCommand.regex.test(parsedCommands.mainCommand)) return regexCommand.command.Call(parsedCommands, message, botSettings);
        }
        return `Unrecognized Command: ${parsedCommands.mainCommand}.`;
    }
    Ready(){
        // Sort Regex Command to Display more beautifully
        // ...
    }
    constructor() {
        this.commands = {};
        this.descriptions = {};
        this.regexCommands = [];
    }
}
其中,CommandUnits接收正常的Command和正则形式的Regex Command,所有的Command在使用前都需要显式的注册到CommandUnits中。
并且,CommandUnits在确定接受完所有的注册后,需要显式的调用Ready去做一些初始化工作。
随后,就是Command的具体实现。同样,笔者定义了一个类来完成封装。
// ./commands.js
class Command{
    _parse(commands) {
        const parsedCommands = {
            mainCommand: commands.mainCommand,
            err: "",
            args: [],
            flags:{}
        };
        // Parse parsed Commands to suit needs of this specific instance
        // ...
        return parsedCommands;
    }
    Call(commands, message, botSettings) {
        const parsedCommands = this._parse(commands);
        if (parsedCommands.err !== "") return parsedCommands.err;
        if (parsedCommands.flags["help"] || parsedCommands.flags["h"] !== undefined) return this.help();
        return this.caller(parsedCommands, message , botSettings);
    }
    help() {
        // Return Help Information for this instance
        // ...
    }
    /**
     *
     * @param {string} mainCommand
     * @param {Array<{flag: string, description: string}>} booleanFlags
     * @param {Array<{flag: string, description: string}>} nonBooleanFlags
     * @param {(commands, message, botSettings) => string} caller
     */
    constructor(mainCommand, booleanFlags, nonBooleanFlags, caller) {
        this.mainCommand = mainCommand;
        this.booleanFlags = { flags: [], descriptions:{}};
        this.nonBooleanFlags = { flags: [], descriptions:{} };
        for (const flag of booleanFlags) {
            this.booleanFlags.flags.push(flag["flag"]);
            this.booleanFlags.descriptions[flag["flag"]] = flag["description"] || "";
        }
        // Add `--help` command
        // ...
        for (const flag of nonBooleanFlags) {
            this.nonBooleanFlags.flags.push(flag["flag"]);
            this.nonBooleanFlags.descriptions[flag["flag"]] = flag["description"] || "";
        }
        // Add `-h` command
        // ...
        this.caller = caller;
    }
}
其中,flags被以Array<Object>的形式注册到Command中,相应的处理函数也被注册到其中。笔者设计Command类时,要求为Command和每个
flag提供帮助文本以自动生成帮助信息。
下面是两个简单的使用的例子。
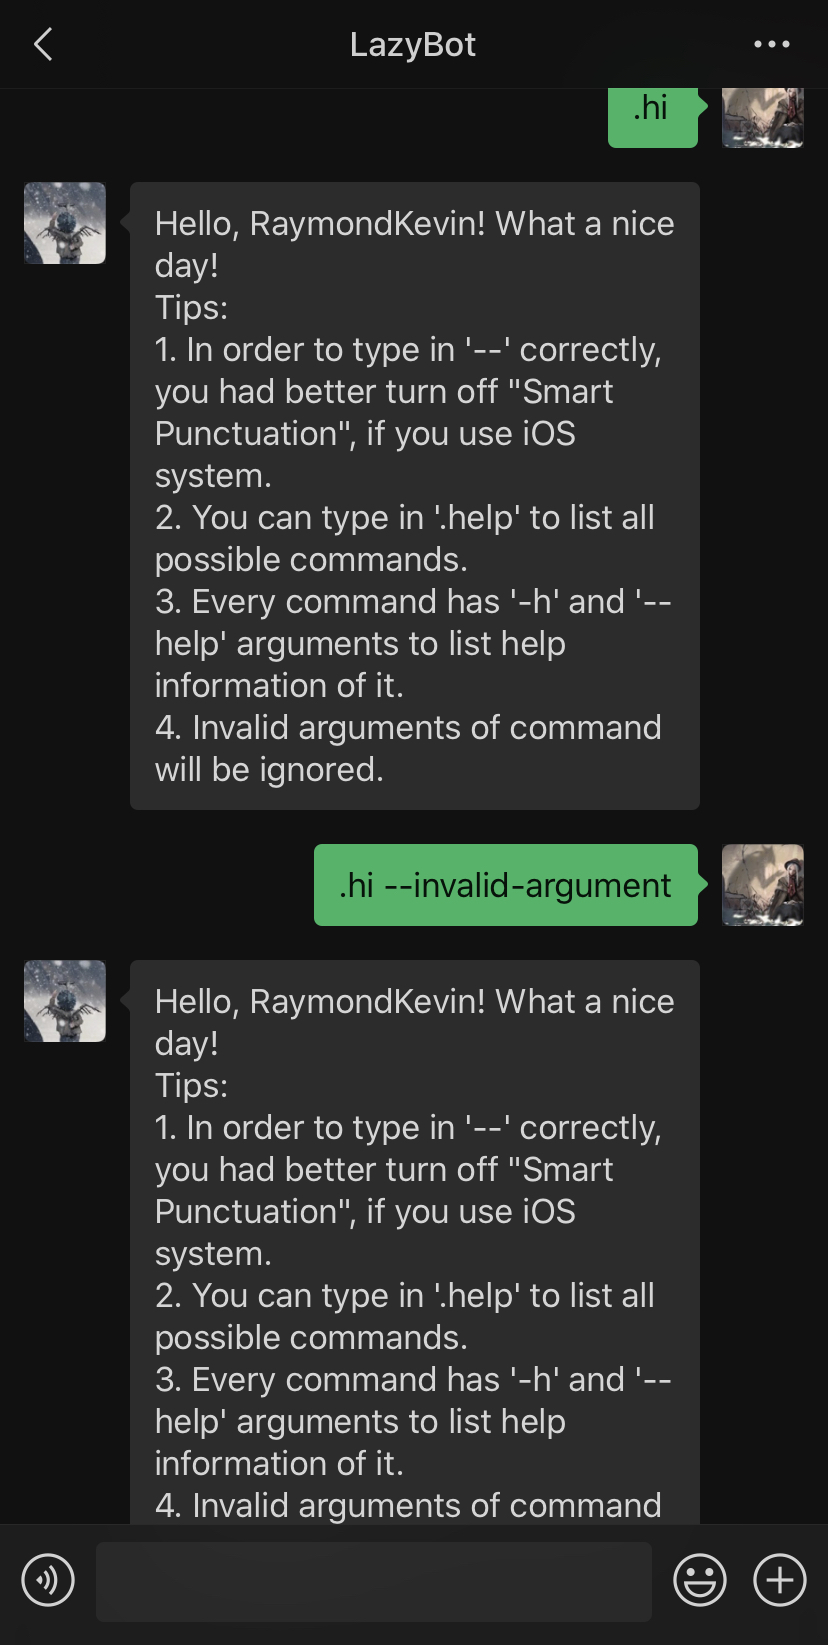
// 让 Bot 识别 .hi 指令,对注册过的用户回复“欢迎”的消息。
commandUnits.RegisterCommand(new Command(".hi",[],[],
function (commands, message, botSettings) {
    if (!botSettings["users"][message.from().id]) {
        console.log(`Invalid .hi command from unregistered user ${message.from().id}`);
        return registerPrompt;
    }
    return `Hello, ${message.from().name()}! What a nice day!`;
}), "Say Hi to Bot");
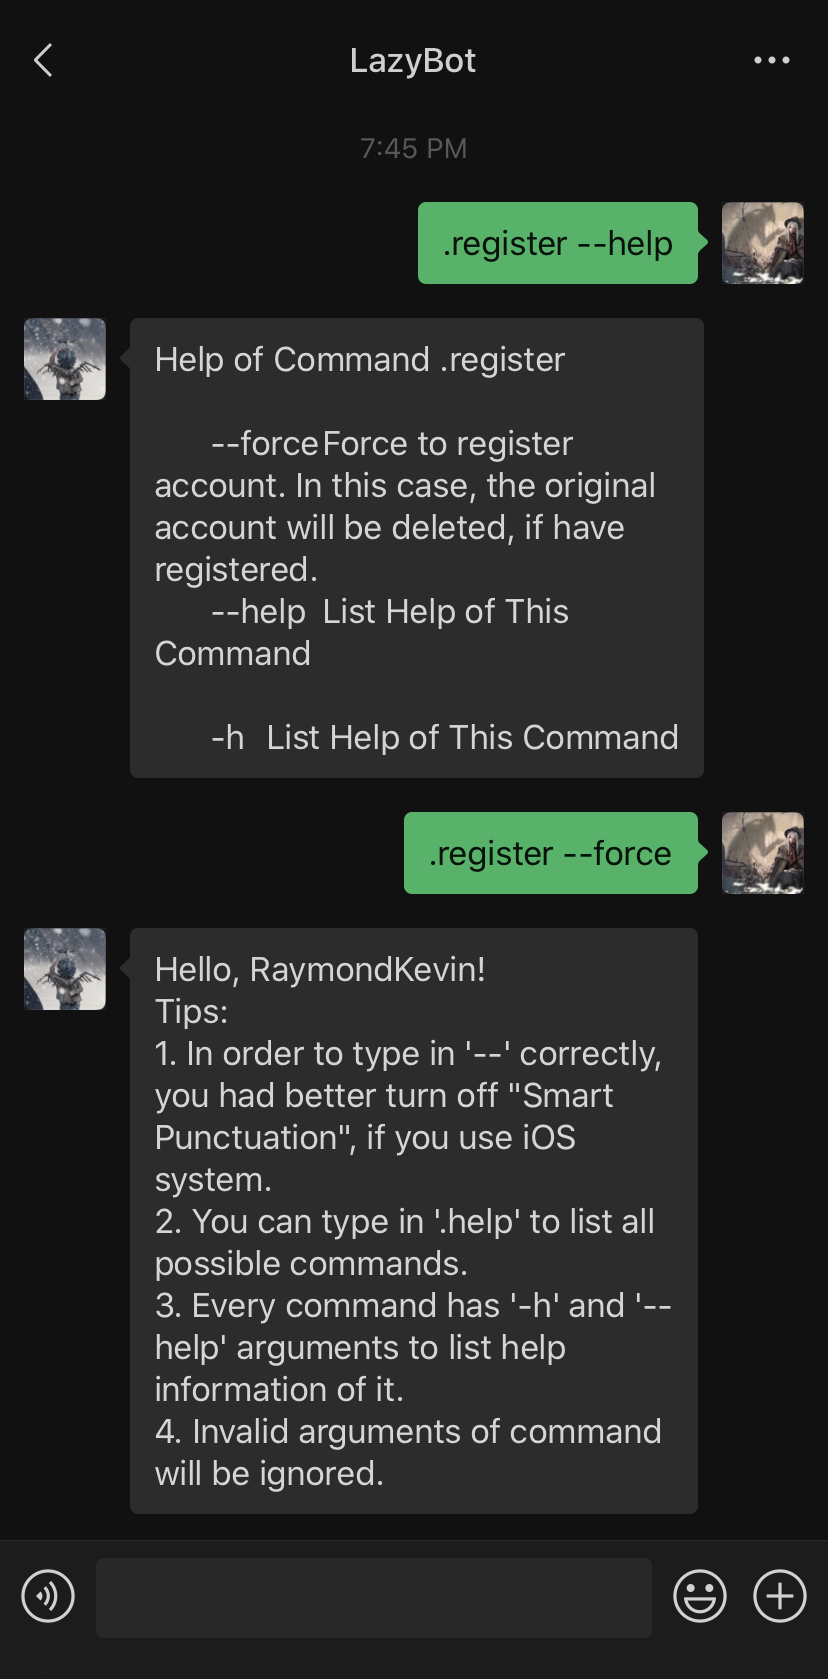
// 让 Bot 识别 .register 指令, 以接受用户的注册。对注册过的用户,提示已经注册过,除非显式加入`--force`参数。
commandUnits.RegisterCommand(new Command(".register",
[
    {
        flag:"force",
        description:"Force to register account. In this case, the original account will be deleted, if have registered."
    }
], [],
function (commands, message, botSettings) {
    if (message.room()) return "";
    const id = message.from().id;
    if (botSettings["users"][id] && !commands.flags["force"]) {
        console.log("Account",id,"Tried to register again");
        return `Have registered Account ${id}`;
    }
    botSettings["users"][id] = {};
    console.log("Account Registered",id);
    return `Hello, ${message.from().name()}!`;
}), "Register Account");
实现群聊信息过滤
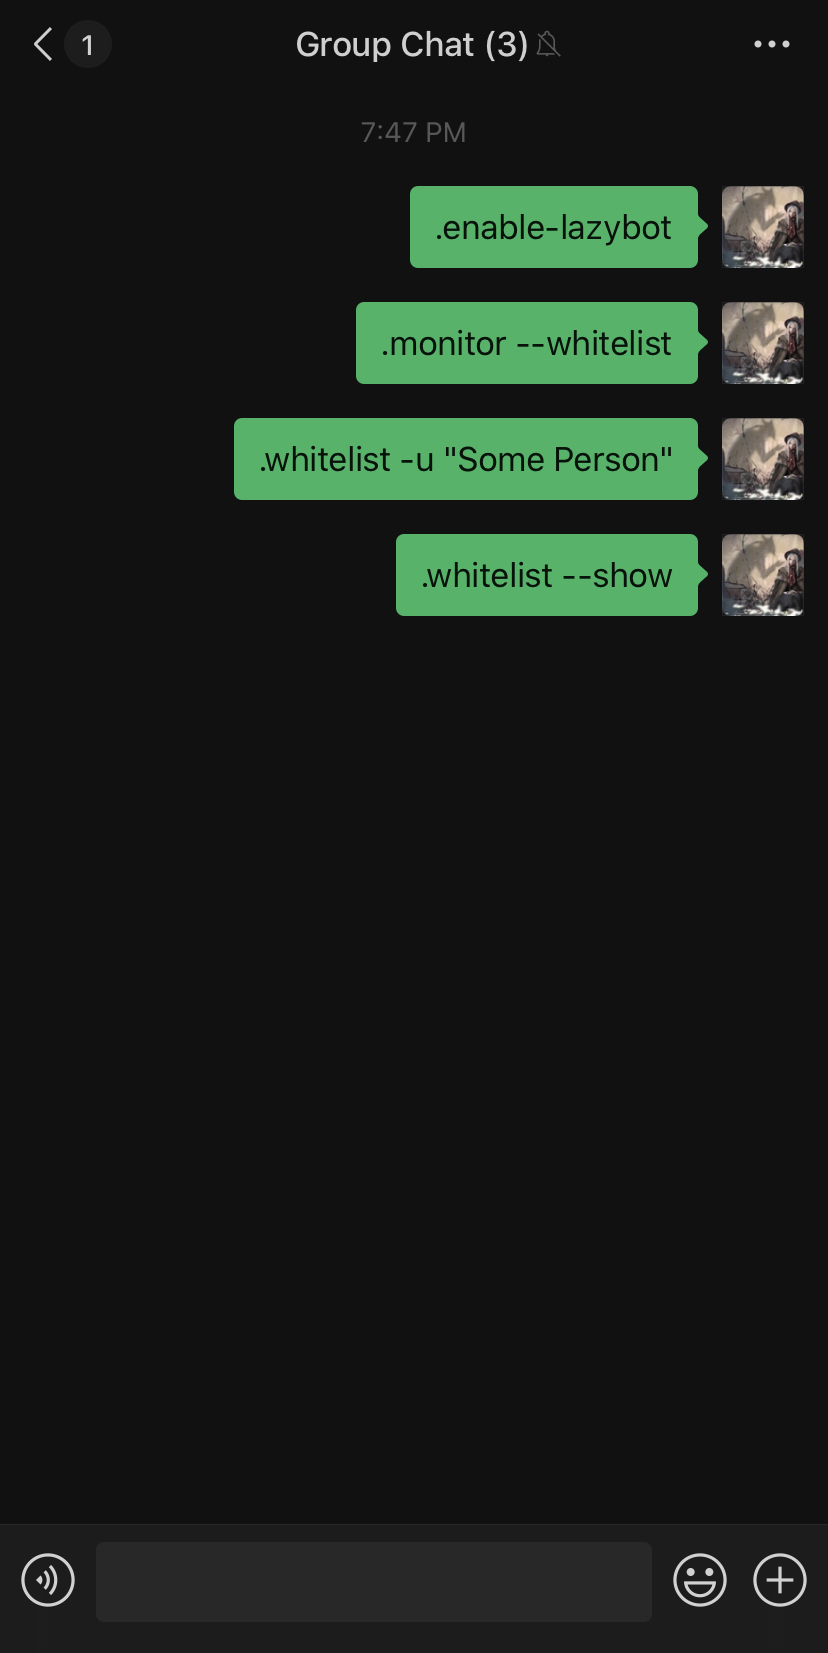
在准备好所有工具过后,就要实现群聊信息的过滤了。笔者采用的是黑名单和白名单方案,各个方案接受指定用户的检测或者是基于正则表达式的文本检测。
保险起见,笔者要求用户显式的开启过滤功能,并且为黑名单和白名单分别设置了开关。
// ./command.js
commandUnits.RegisterCommand(new Command(".monitor",
[
    {flag: "off", description: "Turn Off The Monitor"},
    {flag: "whitelist", description: "Toggle the WhiteList"},
    {flag: "blacklist", description: "Toggle the BlackList"}
],
[],
async function (commands, message, botSettings) {
    // Check whether `.monitor` is valid in current environment
    // ...
    const id = message.room().id;
    const userId = message.from().id;
    if (!botSettings["groups"][id]["monitors"][userId]) {
        // Initialize User Settings in Monitors
        // ...
    }
    // Parse Options
    // ...
    return "";
}), "Monitor Group Chat");
commandUnits.RegisterCommand(new Command(".whitelist",
[
{flag:"delete", description: "Whether to delete rules instead of adding"},
{flag:"show", description: "Display WhiteList"},
],
[
{flag:"u", description: "Add/Delete User to/from White List"},
{flag:"m", description: "Add/Delete Message Filter (Regex) to/from White List"}
],
async function (commands, message, botSettings) {
// Check whether `.whitelist` is valid in current environment
// ...
const topic = await message.room().topic();
const id = message.room().id;
const userId = message.from().id;
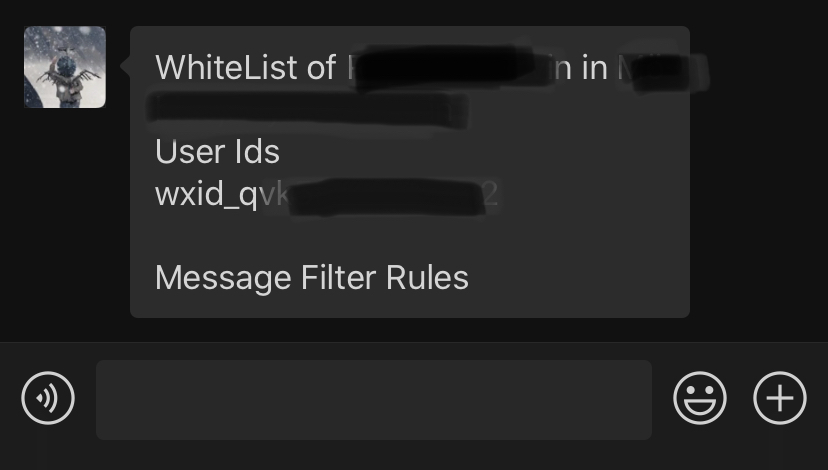
if (commands.flags["show"]) {
// Send Setting Information of White List to User
// ...
return "";
}
if (commands.flags["u"]) {
// Get User's Id from its name and Add / Delete it to / from settings if appropriate.
// ...
return "";
}
if (commands.flags["m"]) {
// Add / Delete filtering rule to / from settings if appropriate.
// ...
return "";
}
}), "Manipulate WhiteList of Message Filter of Group Chat");
其中,.blacklist同理。
然后,完善main.js中的相应事件,LazyBot就初步搭建成功。
示例
3. 已知问题
- 暂时无法完成连续性指令。
- 设置被缓存在本地文件当中,写入数据库会更好。
4. 优势
- 实现了泛式的命令行控制,易于拓展功能。
 使用jekyll include在wechaty博客中快速插入视频